Making a Break-Away Suit Jacket
In the musical “Chicago”, during the number “All He Cares About is Love”, Billy Flynn removes a break-away suit while he sings. He is left in his skivvies by the end of the song. Costuming this number led to the fun and interesting project of creating a break-away suit jacket.
The first task was to find and purchase a suit jacket that could be made into a break-away piece. The showgirls that dance with Billy in this number would be wearing pink. So I searched for a pink-striped seersucker jacket that wouldn’t clash with the Showgirl costumes. I ordered and returned several jackets that wouldn’t work for various reasons. I finally found and purchased a jacket very similar to this one. I bought my version on ebay for $26. Even though it is no longer available on eBay, I recommend looking around for an inexpensive one. After all, you’re going to cut it up, and it would be a shame to butcher an $80 jacket.
You’ll also need a dress shirt that fits the actor, and a tie. I used a $5 white shirt that I found at GoodWill and a pre-tied bow tie that I ordered from Amazon.
Position the Costume Pieces
- Have the actor try on the shirt, jacket and tie together.
- Mark the front of the shirt (with safety pins, disappearing fabric marker, or tailor’s chalk) along the line where the jacket edge falls.
- Adjust the tie to the correct place on the shirt.
- Pin the band of the tie to the neck band of the shirt on one side.
- Have the actor carefully take off the jacket, shirt, and tie. Be careful to leave the tie pinned to the shirt and to not disturb the marks you made on the front of the shirt.
Prepare the shirt
- Button the front shirt buttons
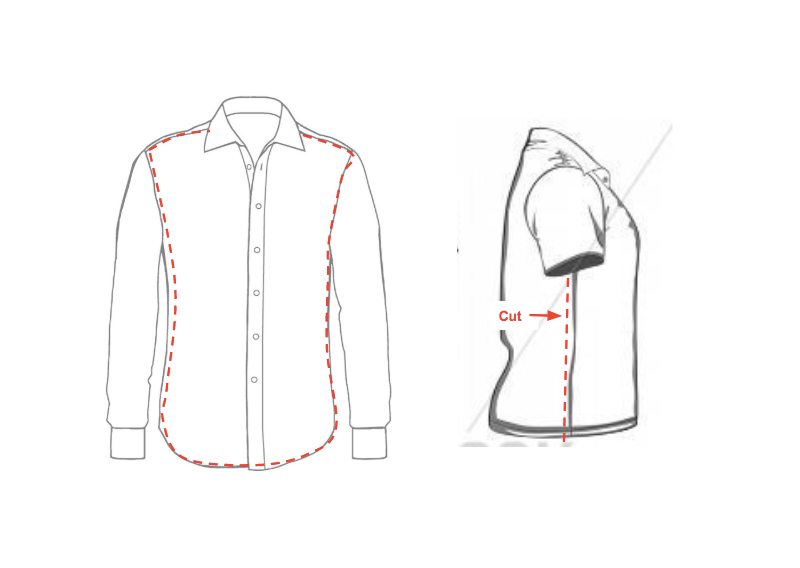
- Cut the front panel off of the shirt. To do this, first cut the side seams of the shirt just past the seams.
- Make sure to cut next to the seams, on the side towards the back of the shirt; This will make the shirt sturdier and will leave edges that will resist fraying.

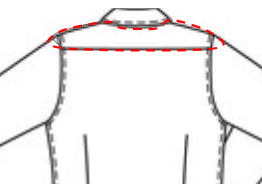
- Then, cut around the front of the armholes and around the top back of the armholes to the edge of the back yoke.

- Cut across the bottom edge of the back yoke; The front of the shirt, with the back yoke and collar attached, should now be separate from the rest of the shirt.
-
- Set aside the rest of the shirt – you will need more pieces of this later.
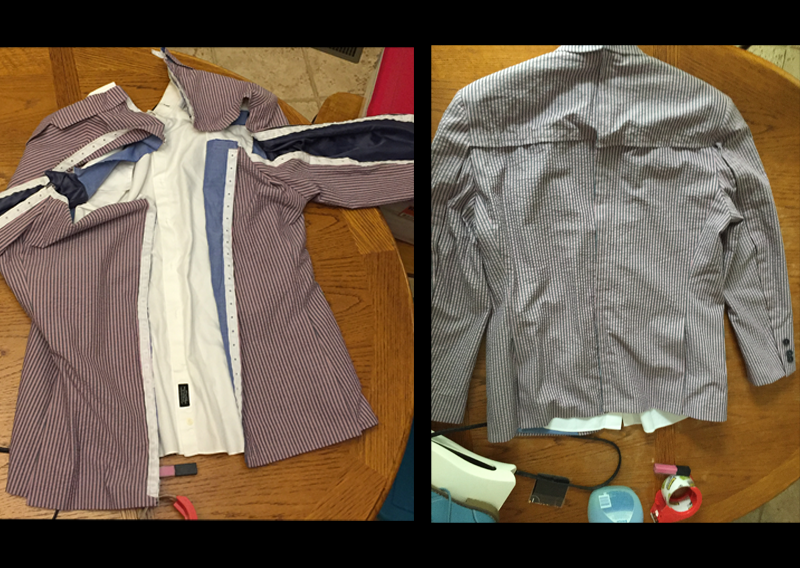
- Put the shirt front inside of the jacket, matching the front jacket edges with the marks you previously made on the shirt front.
- Sew the shirt front to the inside of the jacket lining along the side seams and arm holes; Match the shirt side cut edges to the jacket lining side seams and the shirt armhole cut edges to the jacket lining armhole seams.
- Tack the shirt panel to the inside jacket lining along the jacket shoulder seams.
Attach the tie
- The tie should already be pinned to the collar stand of the shirt at the correct place, from when you fit the shirt and jacket on the actor.
- Make sure the tie is straight, and centered over the top shirt button.
- Tack the tie to the collar stand on both sides of the neck.
Convert the jacket
Once you have the shirt attached to the jacket and the tie attached to the shirt, it’s time to start opening up the back seams so the jacket can be pulled off from the front.
- Start by opening up the vertical center back seam of the jacket. You will need to open the seam of the main fabric and of the lining.
- When you get to the collar, open the seam as far as you can, then cut through the collar to complete the opening.
- Along the new seams, baste the lining to the main fabric, and treat the joined fabric as one piece to add the snaps.
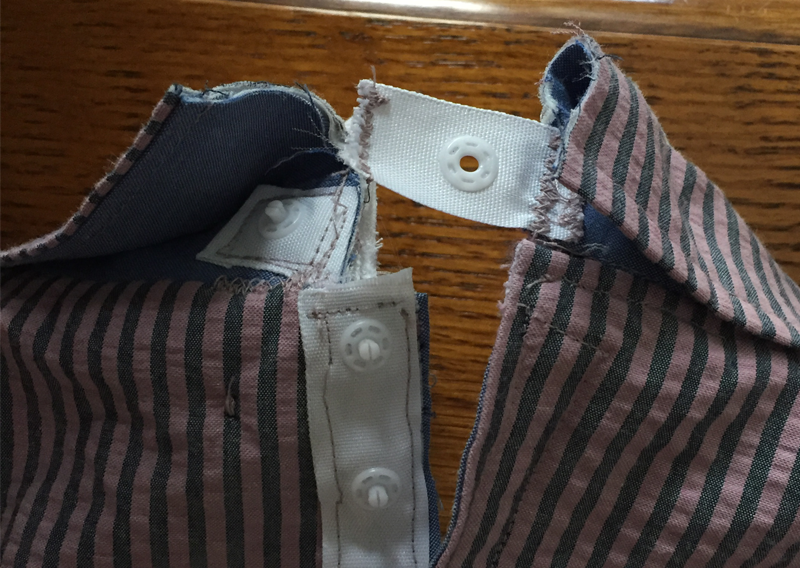
- Apply snap tape to the opening edges. Suggestions on working with snap tape can be found here.

Most break-away jacket instructions on the internet (I began with this one from YouTube) stop here, but the actor I was working with was struggling to remove the jacket fast enough with just the one opening. So, I also cut the jacket across the upper back, and through the back seam of each sleeve. I applied snap tape to these new seams. With this addition, the actor (with a little practice) was able to fairly easily rip off the jacket, shirt, and tie.
I also added a snap tab at the opening of the collar. The actor had to manually pop this snap before he started the break-away, but it held the collar and shirt neck steady until it was time for the break-away scene.

On-Stage
To use the jacket, have the actor pop the snap on the tab at the back of the neck as the time approaches to do the break-away. Then, when it’s time for the transformation, have the actor firmly grasp the shirt/jacket combination in the middle of the front and pull in one firm motion.

